You sowed seeds, covered the tray, watered it — and two days later you see something that looks like a grey or white fuzz. First thought: “Everything’s ruined, mould.” But wait — it may not be mould at all. And even if it is, understanding the cause matters far more than frantically searching for something to spray on it. Let us work through this in order.
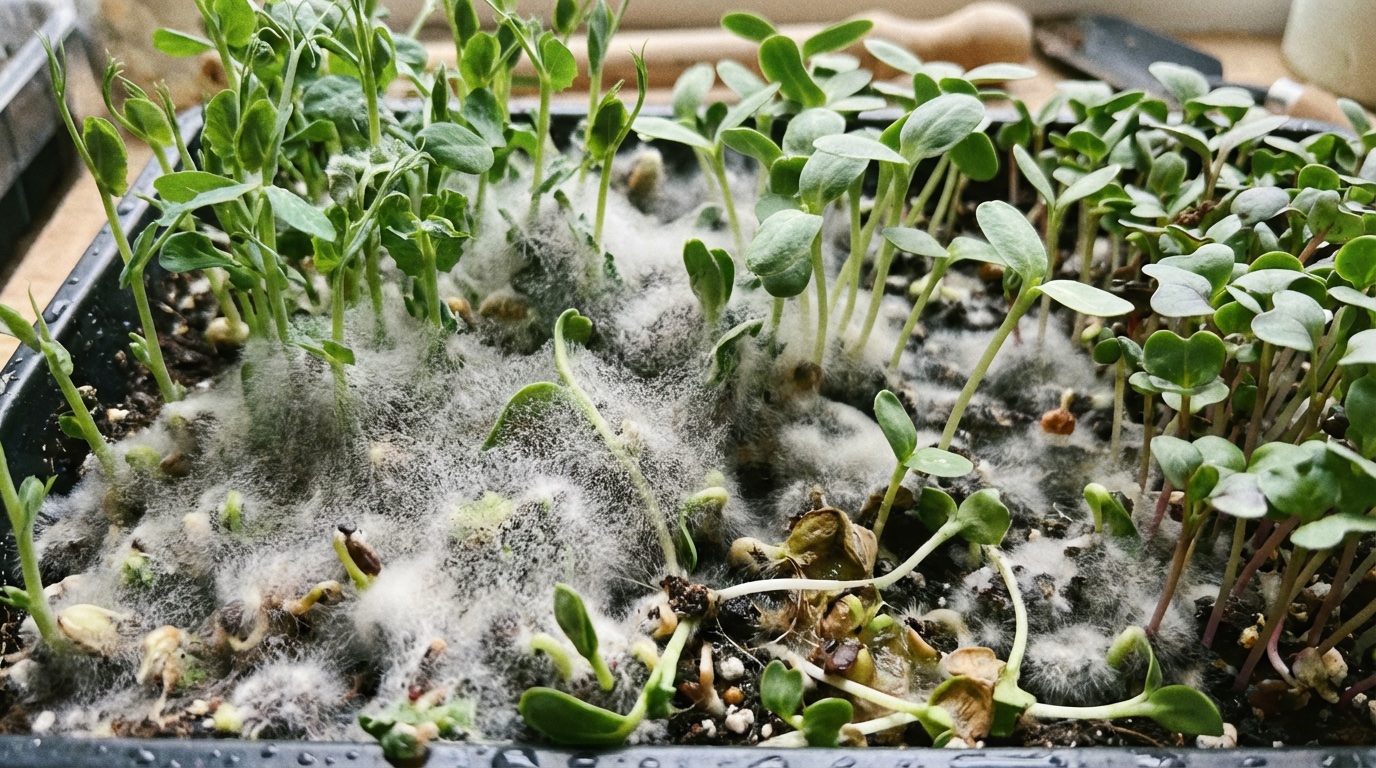
First, the Most Important Question: Is It Mould or Root Hairs?
This is the first and most critical distinction to understand. Most of the “mould” that beginners see on days 2–4 after sowing is actually root hairs. Every seed has tiny lateral roots that, in a humid environment under a cover, stick out in all directions and look exactly like fuzz.
How to tell root hairs from mould:
- Root hairs — fluffy, radiate evenly from the seeds, disappear when the cover is removed and the seeds dry slightly
- Mould — resembles thin cobweb or grey/green/black coating, may have an unpleasant smell, does not disappear after airing
If you remove the cover, air the tray for 15–20 minutes, and the “fuzz” disappears — those are root hairs. Everything is fine; keep growing.
Why Real Mould Actually Appears
Mould is a fungus. It needs three conditions: warmth, moisture, and poor ventilation. When all three are present simultaneously, it will appear regardless of seed quality or substrate.
The most common causes:
1. Overwatering. The substrate or mat is constantly wet; water sits in the tray. Roots cannot “breathe,” and the fungus has its ideal environment.
2. Poor drainage. A tray with no holes, or holes that are not being used. Water accumulates at the bottom.
3. No ventilation under the cover. Seeds are kept covered for the first 2–3 days — but with zero airing, a “greenhouse” of excess CO₂ and moisture builds up under the lid.
4. Sowing too densely. Seeds lie on top of each other with no airflow between them.
5. Contaminated trays or substrate. Reusing trays without washing, or using substrate from an unverified source.
What to Do If Mould Has Already Appeared
If mould is on the substrate but the greens still look normal, action is possible. If mould has spread to the sprouts themselves, it is better to discard the batch and identify the root cause.
Step 1: Stop top-watering. Switch to bottom watering — pour water into the tray underneath and let the substrate absorb it from below. This keeps the top layer drier.
Step 2: Increase ventilation. If the tray is covered, remove the lid for 20–30 minutes twice a day. If you have a small fan, point it near the trays (not directly at the plants).
Step 3: Treat with hydrogen peroxide. Dissolve 1 tablespoon of 3 % hydrogen peroxide in 1 litre of clean water. Mist the substrate (not the leaves!) with a spray bottle. Peroxide is safe for plants and destroys mould.
Step 4: After harvest — wash the trays. With hot water and baking soda or a food-safe disinfectant. Dry completely before the next sowing.
Warning: If the mould is grey or black and has covered more than half the sowing, do not try to save it. Pathogens may have entered the substrate, and the next batch will suffer too.
Prevention: How to Stop Mould Coming Back
Getting rid of mould is easier than it seems. Four rules that close 95 % of problems:
Rule 1 — Do not overwater. The substrate should be moist, not wet. Test: squeeze the mat or a handful of coir — a few drops come out but there is no flow. That is the right moisture level.
Rule 2 — Bottom watering. Especially once the greens have sprouted and are sitting under a cover. Pour water into the bottom tray — the plants will take what they need.
Rule 3 — Air twice a day. Under a cover: remove it for 15–20 minutes morning and evening. Without a cover: place trays where there is airflow (not under a canopy, not in a closed cupboard).
Tip: 3 % hydrogen peroxide diluted 1:10 in water is an excellent preventive measure. Mist the substrate between waterings once a week and mould will not appear even with dense sowing.
Which Crops Are Most Prone to Mould
Not all crops are equally susceptible. Knowing this helps you adjust conditions for each variety.
Prone to mould:
- Basil — fine seed, clumps together in excess moisture
- Coriander — germinates slowly, stays under the cover longer
- Legumes (pea, bean) — thick seed coat, prone to souring if soaked too long
Less susceptible:
- Sunflower, radish, mustard — fast germination, less time under the cover
- Rocket, cress — fine seed but fast
For problem crops (basil, coriander): shorten the covered period to 1.5–2 days and switch to bottom watering immediately.
Key Takeaways
- White fuzz on days 2–3 is almost always root hairs, not mould. Air the tray and check.
- Mould comes from excess moisture + poor ventilation. Remove one of the two and the problem goes away.
- At first signs: bottom watering + airing + hydrogen peroxide spray 1:10.
- Prevention is simpler than treatment: the “moist but not wet” rule + airing twice a day.
- Dirty trays mean new mould. Wash and dry before every sowing.
Mould on microgreens is a signal, not a verdict. Most of the time two changes are enough: less top-watering and more ventilation. If the problem recurs, check the substrate, sowing density, and tray cleanliness. After a few cycles you will develop a feel for the right moisture level — and mould will stop appearing altogether.