
Flavor profile
Taste & aroma
Soft, grassy, fresh - Sweet, with a distinct nutty note - similar to alfalfa, but a little softer. Barely perceptible, grassy aroma.
Sweet, with a distinct nutty note - similar to alfalfa, but a little softer. There is no sharpness, no bitterness, no earthiness
Barely perceptible, grassy, fresh - reminiscent of freshly cut grass and young peas, practically does not affect the aroma of the dish.
Gentle, Soft, Fluffy - clover gives a fluffy structure that "blows" the salad up
Why flavor may vary batch to batch
The content of isoflavones in clover depends on the stage of vegetation and growing conditions. At longer cultivation (8–10 days) the concentration of phytoestrogens is higher. At early cut (5–6 days) the taste is softer and more neutral. The temperature affects the speed: when it is cool, the sprouts are denser and more aromatic.
Culinary use
How to use
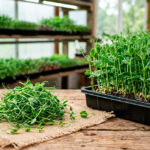
Clover is a great culinary accent. Add fresh at the end of cooking or directly on the plate.
Morning smoothie
a handful of clover in the blender completely dissolves without changing the taste of the fruit. A convenient way to "hide" greenery for those who are not used to it
Poached eggs on toast
put the clover between the toast and the egg: it warms up slightly, but does not wilt, and gives a nice cut
Avocado and citrus salad
clover fills the space between the pieces of avocado and gives the salad volume without extra calories
Cold snacks and canapés
a small bundle on a cracker with soft cheese and a drop of honey looks impressive and tasty
Fruit salad
a rare but successful combination: clover with strawberries, orange and mint. The nutty note complements the sweetness of the fruit
Bowl with cereals
quinoa or bulgur plus clover, cucumber and lemon dressing. Clover gives freshness without the taste of "grass"
Perfect pairings
Clover fills the space between large leaves without drawing attention to itself
Clover looks impressive as a "substrate" for the main component — and at the same time does not interfere with its taste
It is better to avoid heavy sauces - they will simply suppress the tender greens
- Do not heat treat: from the heat, tender stems instantly wither and turn into a slimy, tasteless mass.
- Do not press in the package: clover is very voluminous, but tender. When it is pressed, the leaves stick together and the greenery loses its attractive appearance.
- Do not refuel in advance: after 10–15 minutes in an acidic dressing, the stems will settle and wither.
Home storage
How to store
Clover keeps longer than most microgreens. Follow simple rules to keep it fresh for up to 3 weeks.
Don't cut more than you plan to eat right away. Store in refrigerator at +4...+6°C. No watering needed — natural moisture is enough.
Place in an open container or plate, cover with a damp paper towel. Don't seal — without air, greens yellow faster.
Don't wash until ready to eat. Wet greens spoil much faster. Rinse just before serving.
Nutrients & health
Benefits & composition
Clover is valued for its rich vitamin-mineral composition and bioactive compounds typical of microgreens.
Like most microgreens, clover contains a concentrated amount of nutrients relative to its weight — many times more than the mature plant.
| Protein | 5.5 g — building material for cells |
|---|---|
| Calories | ~32 kcal |
| Vitamins | K |
| Minerals | Calcium |
- To people from susceptibility to allergy to legumes (peanuts, soybeans) should start with small amounts - clover belongs to the same family.
- To those who accept blood thinners, it is worth maintaining a constant level of vitamin K consumption without sudden changes in portions. It is better to check with the doctor.
- People with certain autoimmune conditions should consult their doctor before regular use, as isoflavones can affect the hormonal background.
This information is general in nature and is not medical advice. Composition data: USDA FoodData Central.
Worth knowing
isoflavones
Clover is a source of isoflavones — plant compounds that are traditionally included in the diet as part of a variety of foods. They are of interest to those who monitor hormonal balance, although scientific research on their specific effects is ongoing.
vitamin K
It contains vitamin K and **calcium**, which makes it an interesting addition to the diet for those who care about the condition of bone tissue.
iron and copper
Clover is a source of iron and copper, minerals that are involved in hematopoiesis. Suitable as part of a varied plant-based diet for those looking for new sources of these elements.
Antioxidants and biologically active substances
Microgreens are a concentrated source of antioxidants — compounds that are being studied in the context of protecting cells from oxidative stress. Regular consumption of a variety of microgreens is part of a balanced plant-based diet.
Clover: how to grow — step-by-step guide
Growing parameters, agronomy, common mistakesGrowing parameters
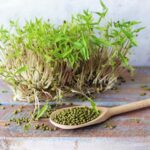
Very small, round, leguminous
Watering
- Water it 1-2 times a day very gentle spraying or bottom watering
- ONLY bottom water or fine mist - strong jet washes out small seeds
- Keep the substrate evenly moist, but not wet
- A sign of lack: tiny sprouts begin to lay down, the substrate brightens → gently moisten
Storage
| Uncut in tray | Fridge +4...+6°C | up to 3 weeks |
|---|---|---|
| Cut in container | Refrigerator | up to 7 days |
| Room temperature | 1–2 days |
Harvest
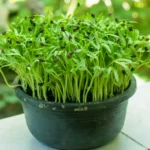
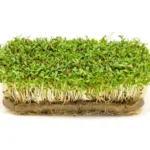
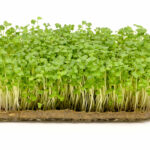
Landmark — cotyledons fully opened and bright green, without shells. Height 5–7 cm. The first true leaf has not yet appeared. Clover does not grow as aggressively as cabbage, but it is not worth delaying - the stem begins to turn yellow from below.
Sharpen a knife or scissors as low as possible - almost under the root. The stem is thin, easy to cut. A dull knife crumples the stem and leaves ragged edges, which spoil more quickly.
Wash in cold water very carefully - clover does not tolerate rough handling. Shake gently in water, do not rub. Dry by letting the water drain naturally, or spread gently on a towel. Do not centrifuge - the delicate leaves will be remembered.
Seasonal adjustments
- Mold: the main risk in summer — small seeds and dense planting of clover are poorly ventilated, damp heat triggers mold in the first days
- Ventilation: open the tray 2 times a day during the blackout phase - even in the absence of visible moisture
- Watering: reduce the amount of water, but more often - clover does not tolerate stagnation
- Collection: harvest 1 day earlier than the standard - in warm weather, the stem quickly overripes and the leaf turns yellow
- Storage: after collecting immediately in the refrigerator, the fluffy structure will wither within a few hours at room temperature
- Germination: clover grows well even in cool weather, but the cycle is extended by 2-3 days - planning is important
- Watering: use water at room temperature, not cold - cold water suppresses the fragile seeds at the start
- Expect: in winter, the clover turns out to be denser and a little sweeter - the coolness enhances the nutty note
Water pH and EC
Optimal range for Clover: 6.0–7.0. Clover grows well in a slightly acidic and neutral environment. At a pH higher than 7.5, a slight growth retardation is possible, but this is not critical for a short cycle of microgreens.
Optimal range: 0.8–1.5 mS/cm. Low mineralization is optimal for delicate clover sprouts. Hard water (EC >2.0) can inhibit the germination of small seeds.
Experienced grower tips
Sand for even sowing
Mix 0.5 g of clover seeds with 1–2 g of fine dry sand. It is much easier to distribute the mixture evenly on the mat - this is a simple technique for beginners who have not yet felt the "hand" for small seeds.
Before the light - "parna"
After dark, cover the tray with a lid and moisten the sprouts from above. Let stand for 1-2 hours. Almost all "helmets" will fall off by themselves - no need to remove them with tweezers.
Do not rush to wash before selling
Dry clover is stored twice as long as wet. Wash only immediately before shipping or selling, or even better, recommend that buyers wash themselves.
Sell with alfalfa in the mix
Clover and alfalfa have the same speed and taste - they can be sown in the same tray or mixed after cutting. A mix tray looks more interesting and often sells for more.
Control the smell, not the look
The white hairs near the root scare newcomers, but this is not mold - it is normal clover root hairs. Focus on the smell: fresh - everything is fine, musty - there is a problem.
Agronomy notes and common mistakes
- Sowing: Small seed - sow evenly in very high density. Without pre-soaking. After sowing, mist lightly.
- Clamp: Light pressure (0.5–1 kg) for 1–2 days, or without it at all — the seeds are small and do not need strong pressure.
- Temperature: +18...+24°C. Clover is unpretentious, but at +26°C it grows faster and is less tender.
- Watering: 1-2 times a day, always carefully. Excess moisture and poor ventilation are the main problem.
- Ventilation: Very important. Clover is prone to clumping and mold due to stagnant air.
- The sowing rate is higher than 0.5 g → Mildew in the center of the tray, stem rotting → Stick to 0.5 g — this is the optimum for clover
- Watering from above during the growing season → Wet leaves stick together, mold on the surface → Water only from below in the tray
- "Helmets" on leaves → The leaves remain closed, the greens look ugly → Moisten with a sprayer before going out into the light, keep covered
- Root confusion with mold → White fluff at the base of the stems → These are normal root hairs - smell: mold smells musty, roots - neutral
- Premature birth → Sprouts are yellow, thin, do not open → Give 1 more day in the dark, take your time
- Packaging "in longing" → Greens stick together, lose volume and appearance → Pack in a wide container without pressing, with a paper towel at the bottom
Variety selection
Red clover
Tetraploid, double slope
The most common choice for microgreens. Rich greens, slightly sweet taste, even germination.
Pink or white clover
Dutch, Ladino
A slightly more delicate taste and smoother steps. Suitable for mixes where a neutral base is required.
Що далі?
More crops in the catalog
Explore similar and contrasting flavors — from basil to amaranth